Pages

Monday, December 29, 2014

{DIY} Suspended Copper Flower Hanger


HEY YOU! Hope the holidays were merry and bright. We are days away from the new year. I know I say this every year but this year especially has flown by. I cannot wait to see what 2015 has in store for us.

You may have noticed that I have a slight obsession with flowers, specifically plants. House plants. Air plants. Terrariums.You name it, I want it dangling from the ceiling. Todays post is about a bigger plant, so head on over to your local plant nursery and find yourself a cute little or big plant, that hangs of course.

Have you noticed the copper trend lately? It is all over the place. I am loving little bits of it through out the house. And I had the perfect spot for a little suspended cable action in the play room.

::Supplies::
1 piece of copper pipe (they make many different sizes, I chose 3/4 inch)
2x 90 degree angle copper slip elbow fittings
1 pkg white swag hooks
8 feet cable rope
1 pkg 1/8 clamp set


::Instructions::
1. If you need to buy a larger piece of copper pipe and cut it down, do that first. (Hack saw or Pipe cutter)
2. Attach your 90 degree elbow slip fittings to each end of the copper pipe with the open end facing up.
3. Thread the cable rope through
4. Decide how long you want the cable to suspend from the ceiling.
5. Start with one side and thread the cable robe through the clamp and back down to create a loop. Tighten with a pliers.

6. Continue onto the other side, thread the cable rope through the second clamp and back down to create a loop. Tighten with pliers.
It is now ready to be hung.
7. I like to use swag hooks. They come with a toggle which makes it super easy to install and strong enough to hold. If you have never heard of a toggle this is going to be an Ah-Ha moment. They are amazing. Click here to see a video on how to install a swag hook.
8. Hang the loops onto the swag hooks.

Monday, December 22, 2014

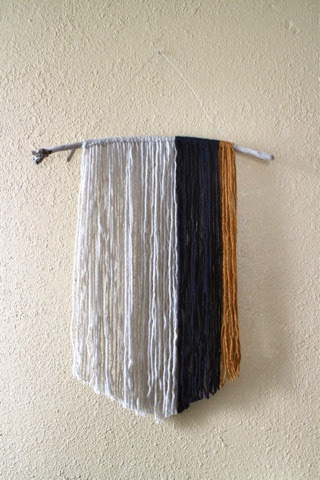
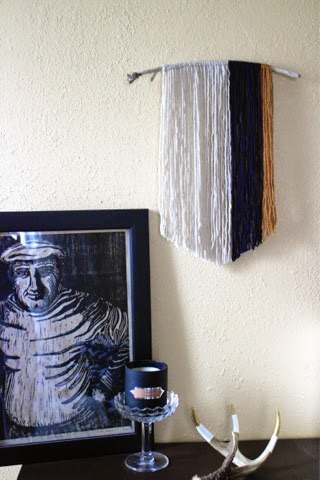
{DIY} Easy Macramé Wall Hanging


I don’t know about you, but i’ve been oohing and ahhing over every wool, yarn or weaved art installation i’ve been seeing online.  I love the texture, the earthiness and interest it brings into any space. It's a great way to add art without spending a fortune and the best part is that it will be one of a kind.
Click through for the easy DIY steps to making your own yarn wall art piece!


Supplies:
  • Assorted wool (I used mustard, white and navy)
  • Scissors
  • Circular dowel cut to desired length OR dig in your craft closet and find a piece of beach drift wood like I did!
  •  String
TIP: If you don’t have a saw to cut your dowel, you can get your local hardware store to cut it to length for you.


Step 01: Work out how long you want your longest part of the wall hanging to be and cut a piece of wool twice that length.
Fold over the wool length in the middle with both pieces side by side. If you pinch both these pieces together about an inch from where they fold over, you’ll see a little loop form.
Fold the loop end over the length of dowel and then pull the ends from underneath the dowel and through the loop.
You should end up with one little knot like you see above.


Step 02: Keep knotting your wool until you are happy with the distance you have covered across your dowel rod.
I used some contrasting colours at the ends as well.
Lay your hanging flat and cut diagonally up from the middle of the bottom wool lengths to give your hanging an angular edge.
Try to keep the wool flat as you cut. To make things easier, you could draw a line to follow on a piece of paper.


Add some string to either end of your dowel and you’re easy macrame wall hanging is ready to go!
I can picture this in some bright neon colors that would make a dark corner of your home pop with happiness. 


Monday, December 15, 2014

{DIY} Air Dry Clay


Last weekend I attended the cutest art fair here in Milwaukee and discovered such talented artists. I came across tons of clay hanging planters, pots, and plates. I searched the internet, primarily Pinterest, to look for the material used to make these cute little projects. My research of course lead me to Michael's and Joann's were I purchased my first package of Air Dry Modeling Clay. There are tons of choices out there with all different price points and different colors to chose from. I ended up with what you see below. It was super easy to work with and it is pure white.


As soon as I got home I ripped it open and started thinking "what could I do with this clay". Well I ended up making several things actually. They all turned out pretty cute.

First I started with a hanging planter--I just cannot get enough of those things. I want them everywhere.

::Directions::
-You want to figure out how large you want your circular plate to be. I took about a golf ball size amount of clay and rolled it out flat until it was approximately 1/4 inch thick.
-Then I used a coffee mug to create the circle. Feel free to use any shape or size that you want.
- Lastly I used a straw to punch through the clay to create the holes.

At this point you need to let it dry completely before doing anything else. It dries to the touch in 24 hours but it took my planter 72 hours to dry completely.
Once it is 100% dry you can use sandpaper to even out any imperfections. Go ahead and paint it if you would like as well. Make sure you are using an acrylic paint that can be used on glass/clay. For this specific project I opted to use just a sharpie paint marker to create a very simple triangle.

I used Realeather deerskin lace (can be bought at Joann's) to threat through the holes and hung it from the ceiling.
You want to make sure to double knot the underneath so that it is secure.

Then go ahead and add an air plant or a succulent pot.

I don't want to leave you with just that. I also followed the same steps again making it quite a bit larger (minus the holes) and rolling my grandmothers doily over the clay. It created such a beautiful pattern. I let it dry inside of a bowl to keep its shape.

After it was completely dry I hand painted each raised part with Martha Stewart's Acrylic Paint -- Mother of Pearl.

And lastly, a mini bowl for our wedding rings. This time I rolled a different doily on the back side and let it sit in a smaller bowl. Finished it off with some letter stamps and black ink.


Thursday, December 4, 2014

{Hair} Top Knots


We heart all things Top Knot here at Blonde Brunette and Brass and I'd bet my bottom dollar you too are coveting this gem of a hairstyle. It's an easy, versatile and quick 'do to throw together and best of all it can look polished-chic or messy-cool and there are just so many different styles to play around with. From hidden braid buns to messy up-dos, this is one tresses choice you'll definitely want to dabble with (duh!). After all, when a hairstyle is used on the runways for several consecutive seasons, there has to be a reason, right? Right.

Love the look of some of these styles? Here's how to get them:

1. Find out how to get the perfect donut bun here.
2. Learn how to do the amazing upside down braid bun.
3. Pump up the volume with this big bun tutorial.
4. Joey Scandizzo shows us how to get the perfect summer bun.

Monday, December 1, 2014

{DIY} (s)Ombre on the Wall


Did you know that you can (s)ombre a wall? Sombre meaning subtle ombre. It has been all the hype in hair for the past 2 years, maybe even more. I decided to give it a try on the walls of our upstairs bathroom. I have to say it did take some time and it will not be zour easiest project but the result is beautiful.

What you  are going to need is a color palette and by this I mean walk into your favorite paint store and grab a swatch family as I like to call them. It has at least 3-5 colors ranging from the lightest to the darkest. You are going to choose a dark color, a medium and a light. You will have to decide how much you are going to need. I did 3 walls with 3 quarts.

Before you do anything you want to make sure your walls are ready for this technique. You are going to want to prime the walls for sure if you are going lighter. I will leave it up to your discretion if you already have light walls if you want to prime. It's always nice to start with a blank canvas. I love to use the Multi-Purpose primer from the good ole' SW. It isn't thick and covers really well.

p.s. the previous color did nothing for the bathroom. It was way too dark and made the bathroom even smaller than it is. :(


+Supplies+
-3 colors, if you want to use just two colors and mix them together for your middle you can do that as well.
-roller
-paint pan
-2 brushes

First take one of the brushes and paint your trim along the bottom using your darkest color and decide how far up you want to go on the sides. Fill in the space using your roller if needed. You will want to take the second brush and use it dry to help blend your lines. Dry brush up and down and side to side. The line does not have to be straight but you want it to bleed into your next color.


Next you are going to take the second color and apply it to the wall the same way. First cut in on the sides and fill in with the roller. Take the dry brush and blend it down towards your darkest color trying to make the line between the two colors almost invisible. You may want to take into consideration when picking colors out that the more contrast between your colors the harder it is going to be to blend them seamlessly. You are also going to blend the color upward with your dry brush to prepare for the lightest color.

Now apply your lightest color just as you did the first two. Cut in from the ceiling down and also from the sides. Fill in with a roller. Use the dry brush to blend your color downward.

If you need to blend more don't hesitate to mix the transition colors together to hide the lines.


Voilà, you're now finished.

Sunday, November 23, 2014

{DIY} Sparkling Pinecones


Today we have a very simple but super stunning holiday craft for you! You've probably seen some shiny, sparkly pinecones in stores and magazines, and I've also seen them in grocery stores and florist holiday bouquets. Their uses are endless, and they are so simple to DIY - so simple that we may have made a few dozen for my cousins winter wedding. 


Tucked into floral arrangements, used as place cards on a holiday table-setting, or even as ornaments on a tree would all be fun and festive ways to add these sparkly bits of nature to your home. 


These really are simple, but are totally messy, so I recommend taking this project outside. Here's what you need:
  1. Spray adhesive - don't even bother with glue, this is the quickest and easiest way to get the pinecones super sticky and ready for glitter. 
  2. Glitter - I found the "bigger" glitter to be better. While the really fine glitter is lovely for lots of craft projects, I found the chunkier craft glitter ideal for this project.
  3. Pinecones - A couple trips to the park with some buckets provides ample pinecones. You can also buy pinecones at craft stores. 


We grabbed one at a time and sprayed them completely with spray adhesive. Be sure to spray your adhesive far away or in the opposite direction of your glittering station. That way you can pour all your excess glitter back into the container. With your pinecone sprayed with adhesive, liberally dump glitter all over the pinecone, turning as you work to get it covered on all sides. Be forewarned, it gets pretty messy and you'll end up with a ton of adhesive and glitter on your fingers. I don't think it can really be avoided, but it was actually pretty fun so just embrace your inner-child artist! Take a few minutes to shake off the excess glitter from the pinecones before letting them dry and moving them into the house. 


Monday, November 17, 2014

{Foodie} Bark for the Postman

Odd title I know. We have been living in this house for almost 1 year and I've got to tell you I love our postman. I have never in all the years that I have been eligible for receiving mail (aka bills and fake checks that I wish were real) ever experienced anybody else like our mailman Jeff. He deserves an award for all time best mail deliverer with a smile. He goes above and beyond, knows when Teagan is napping so he makes sure not to ring the door bell and brings my doggie Dakota a treat everyday. Even if I don't answer the door and I have a package on my front step a dog treat is waiting there. Let me be real for a moment, a postman's job is hard, I mean we live in Wisconsin and our temperatures drop to like -20 and they are still bringing my frozen mail with a smile, well at least Jeff is. But let's get to what you are all here for something to make. I know this isn't a DIY project but I have to share it because a) it's delicious and b) holidays are around the corner. So this is Jeff's gift :) or at least part of it. Hope he likes chocolate!

CHOCOLATE SALTED CARAMEL BARK

Ingredients

+ 11oz. bag of semi sweet chocolate chips (if you want you can use dark as well)
+ 11 oz. bag of milk chocolate chips
+1 bag Kraft caramels (individually wrapped)
+ 2 tbsp. water
+ fine sea salt
+wax paper
+cookie sheet

 Directions
1. Rip off a piece of wax paper and place inside your cookie sheet. Make sure that it covers the entire sheet including the corners.
2.set up a double boiler on the stove and melt both bags of chocolate.


 3.Unwrap the caramels and place in a microwave safe bowl with 2 tbsp. of water. Microwave in 30 second interval and stir in between.

4. Pour your melted chocolate onto the cookie sheet. Spread using a spatula making sure to get it nice and even and into the corners.

5. Take your caramel out of the microwave and using a spoon drizzle the caramel over the chocolate until your have used all of it up.
6. Using a butter knife zigzag back and fourth creating a swirl pattern.

7. Sprinkle the sea salt over. There isn't a right a wrong amount so I will leave it up to you.
8. Place cookie sheet in the freezer for 15 minutes.
9. Take cookie sheet out and remove chocolate along with wax paper. Use a meat hammer or your hand and break the chocolate into bark shaped pieces. The wax paper will come off very easy once you are done breaking the bark into pieces.
10. Enjoy! Store in a airtight container in the fridge.

Friday, November 7, 2014

A Very Merry {DIY} Christmas


I really enjoy making crafts, candies, and baked goods to give to my friends and family as gifts. As far as I'm aware (which, admittedly, might not count for much), people enjoy receiving these homemade presents. It's either that, or they don't know how to tell me my banana bread is disgusting and my hand-made dough ornaments are hideous. There's just something special about giving a gift that you spent time making versus a store-bought present, or at least that's what my mom always told me when I gave her sloppily-crafted handmade cards and misshapen cookies for her birthday.

I know it seems early to even be thinking about Christmas presents. Truth is, if you decide to do some DIY presents, you'll be thanking us the week before Christmas. 

+for your mommas+

Personalized Candles
http://www.popsugar.com/smart-living/DIY-Picture-Votives-32490730


Homemade Salted Caramel Sauce
http://www.cookingchanneltv.com/recipes/kelsey-nixon/salted-caramel-sauce.html


Heart Art
http://greenweddingshoes.com/diy-string-heart/


+for your dads+


Reindeer Beer
http://lifeofamodernmom.blogspot.com/2010/11/reindeer-rootbeer-beer.html


Meat Rubs
http://www.testingtrendy123.blogspot.com/2012/12/all-guys-like-nice-rub.html


Beer Coasters
http://postgradcrafting.blogspot.com/2013/09/diy-beer-coasters.html


+for your gals+


http://www.livingwellspendingless.com/2014/02/10/sharpie-mug/


Goodie Cup


+for your men+


Date Nights
http://www.thebabesruth.com/2014/03/a-year-of-dates-in-box.html?spref=p


Sharpie Coffee Mug


Knitted Scarf
http://heather-thegoodlife.blogspot.com/2010/12/burly-tweed-mans-scarf.html