Pages

Monday, July 27, 2015

Plastic and Cement Planters


Wow! What a weekend. Here in Miltown we had German Fest, one of my favorite summertime activities. The hubs and I get all dressed up and head on down to the Henry Meier Festival and drink and devour good german food.
Anywho, I have the perfect diy for you that is super easy. It takes less then 30 minutes to prep.


Here is what you will need.
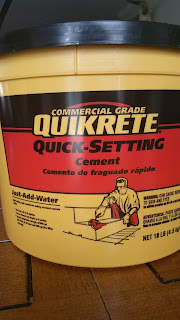
▪ Quick Setting Cement
▪ Water
▪ Prelite/Potting Soil/Peat Moss
▪ Bucket
▪ Paint Stick
▪ Plastic/ Cardboard Containers 《milk cartons, butter tubs, etc.》

A couple different formulas
1 part Quick Setting Cement
1 part Prelite
Water

OR
1 part Quick Setting Cement
1/2 Prelite
Water

OR
1 part Quick Setting Cement
1/2 Prelite
1/2 Peat Moss
Water


▪A rule of thumb▪ Your ratio of cement to prelite will determine how smooth or textured your planter will be. Cement alone will give you the smoothes but also the heaviest. Prelite/Peat Moss/Potting Soil gives your planter a more textured and airy result and also much lighter.
I did a combinations of different formulas. Mix water in small batches. The more water you use the more liquidy it will be. It will also take longer to dry.


Once you have the right concoction pour it into your recycled container. Shake and pat the container to get rid of any air bubbles. Make sure you don't fill it to high because you will need to make a space for your succulent to be planted. Take an old cup, soda can, or disposable cup and push down into the wet cement. Once again shake and pat for air bubbles. Let stand for a minute. You will want to rotate the cup every 45-60 seconds. You don't want it to embed itself into the cement. Once it starts hardening which is within 5 minutes of pouring, remove the cup. You should be left with a perfect circle.
24-48 hours is a good amount of time to wait until you remove the container and plant something.


Sunday, July 19, 2015

Low Calorie Summer Cocktail Favorites

I hope everyone had a great weekend! I had a total project fail this week...so I brought you my favorite drink receipes to make up for it!

Skinny Pina Colada

2 oz. Barcardi Rock Coconut Rum
5 oz. coconut water
2 oz. pineapple juice

Combine ingredients in a cocktail shaker with ice. Shake and strain into a glass filled with ice. Garnish with a slice of pineapple and/or a Maraschino cherry (optional).

Mimosa Lite
2 oz. Minute Maid Light Orange Tangerine Juice
4 oz.ounces champagne
Juice of 1/2 medium-size orange, or 1 to 2 ounces
Add several ice cubes to a tall glass. Squeeze the juice of the orange into the glass. Pour in orange tangerine juice, followed by champagne. Stir. Garnish with fresh orange rinds, curled.

Watermelon Gin Fizz
  • cups diced watermelon, divided
  • ounces gin, divided
  • tablespoons lime juice, divided
  • 1 1/3 cups ginger ale, divided
  • Lime wedges, for garnish

Creamsicle

2 oz. Pinnacle Whipped vodka
5 oz. seltzer water
2 oz. orange juice

Combine ingredients in a cocktail shaker with ice. Shake and strain into a glass filled with ice.

Pina Colada Cooler
1 1/2 oz. coconut-flavored rum
3 oz. pineapple juice
4 oz. sparkling water
1 tablespoon of Coco Lopez Cream of Coconut Lite (found in the drink mixers section of many supermarkets)
Pour ingredients over ice and stir.

Monday, July 13, 2015

Double Pony

HAPPY 50th POST...O.M.G

Hey it's me Heidi! I have been trying some things with my hair since leaving it down in Wisconsin in summer is unbearable. Here's a little tutorial of getting hair off of your neck and shoulders...well kind of and making it look longer.

Keep in mind this is day 6 hair.It's not gross, I swear.


It goes pretty quick. Brush all of your hair out and spray with dry shampoo. This will make it look cleaner and give you a good amount of volume. I really like using Batiste its really inexpensive and doesn't make your hair feel like you have a ton of product in it.

Curl all of you hair. At this point it doesnt really matter if they are perfect or all going the same way. You really just want to get some fullness and bend in the hair.


Spray hairspray before and after your curls, you really want to maintain the big hair look. 

Once you have everything curled section your hair from ear to ear just slightly above the occipital bone. Pin up the top and just focus on the bottom for right now. Take the bottom section and put it in a pony tail. Once it is in the pony tail backcomb or tease so you its just and big and holds it shape. Spray with hairspray. 


Now gather the top together, all in one section. This will be more hair then the bottom section. Your goal is to cover your second ponytail so that it is hidden and only peaks out from the bottom which will give you that extra length. I did a little backcombing at the top to create volume and leave it a little more messy. 


If you need to pull on top to create texture go ahead and do that. Otherwise that's it.  


Monday, July 6, 2015

Easy Braided Summer Updo

We hope everyone enjoyed their Fourth of July weekend! Here in Wisconsin it finally reached higher weather temps, so I thought it would be super fun to show you a super easy updo to keep you cool this summer. 


+step one+

Begin with losely curled hair. Tip- a little bend in the hair helps your updo last all day and night. 


+step two+
Part your hair where desired. Next take a section from your part to behind your ear. This is where we'll start our first braid. 


+step three+
French braid this section and continue down until you run out of hair, secure with a clear elastic band. 


+step four+
Leaving out the braid we just did and an exact section parting on the opposite side of your head, make a big braid and secure with clear elastic band. 


+step five+
This is the fun part! Starting at the top of the braid begin 'fanning' it out like the following two pictures. 


This creates more volume and texture in the hair. 


+step six+
Take the braid and wrap it around itself like a ballerina bun and secure with a couple bobby pins. 


+step seven+
Take the remaining hair that was left out earlier and loosely pin it around your braided ballerina bun. Secure with booby pins. 


+step eight+
'Fan' out the braid along the front hairline. 


+step nine+
Wrap the braid around your braided ballerina bun like shown below. 


I also thought her hair looked super cute with just the front braid in and the rest of her hair loosely curled. Hope ya'll enjoyed! Let us know if you tried it out!