Pages

Sunday, October 26, 2014

{DIY} Coffee Bean Candles


When fall rolls around, it’s fun to make your house feel cozy and warm. As the heat dissipates you don’t mind turning on the oven again to bake a yummy pie. The sun goes down earlier and you can light a toasty fire in the evening. No fireplace? A few scented candles are the next best thing. We added coffee and vanilla beans to these candles and the scent is so good you kind of want to eat it.


Here's our super simple version for you!

+Supplies+


Containers. Search your local thrift stores for some super cute ones like I did! 
Whole or ground coffee beans (depending on effect and container)
Tea light candles (any flavor!)


Instead of using just regular coffee beans, this is the perfect opportunity to use one of those crazy flavors like Pumpkin Spice Marshmallow Fluff Chocolate Cinnamon Caramel. The candles will let off the scent of whatever flavored coffee you use.
Or, if you want something more natural, nestle a few pieces of broken cinnamon sticks or a used vanilla bean into the coffee beans for a spiced coffee candle. The best part is that you can just keep swapping out the tea lights until the coffee stops releasing any aroma

+Instructions+

1. Fill each container with about a cup of coffee beans.


2. Tuck the tea light into the center of the beans and finish by wrapping as desired. See? Quick and easy!


Monday, October 20, 2014

{DIY} Curb Appeal

Happy Monday to you! This weeks post is all about curb appeal. My husband and I bought a house back in December of 2013, so fairly recent. The house is super cute and everything we wanted, until I opened my pinterest account and decided to change everything about it. This summer we added new mulch from The Melvin Mulch Company they have a ton to choose from and the best part is that you can order online and it will be delivered asap in your driveway. Next we replaced the black shutters with graphite shutters. The previous shutters were falling off the house and blowing in the wind reminding me daily that they needed a little attention.
This is a before picture, you will just have to take my word for it that the shutters were a hair from falling of on their own and the black door looked like it had a disease as the paint was chipping off and had my 2 year old daughters attention to pick at it.  But from the street it did not look that bad I guess. After all we still bought the house :)

Pinterest is my life, well more specifically my best friend. It gives me the best advice.

Click to see original picture
So I pinned this and wanted the exact color. I then used Chip It! Which is an online service that Sherwin Williams provides. You can take a picture of something you really like and it tries to figure out the paint colors. Here is my example:
I then chose the color Oyster Bay. It is so close to the original and I couldn't be happier.

The wreath I made last year via pinterest :). Got the anchor door knocker on etsy from thelazypeacock. The hello is also from etsys seller createitgo. Hardware is from Home Depot.


The process was not always going great, there were days that I had to close the door at night and be slightly embarrassed to show it to the street. The neighbor saw my husband at the grocery store and asked "What are you doing to your front door?" My husband told her that his wife was giving it a new look and she commented that the second picture already looked better then the black. HAHA!

I am a sherwin williams snob and will always use their products. I have tried many other lines and have not gotten the great results like I do with SW. So for the paint selection I used their Multi-purose Primer, just 1 coat. And then for the Oyster Bay I used 2 coats of All Surface Enamel.

This paint is wonderful. It is a satin finish and although I prefer a matte finish it was not too shiny. It hardened in 4 hours and I was able to apply two coats and close the door at night without any tackiness or paint stuck to the frame. That was a relief!!!


Well what do you think? Not too bad right? I mean it is an 80 year old house so I have to give it a little bit of a break. I am really happy with the results. Any questions? Contact us.

Monday, October 13, 2014

{DIY} Painted Antlers

{Happy Monday!}

Today we have this super cute, super easy DIY project for you all! 

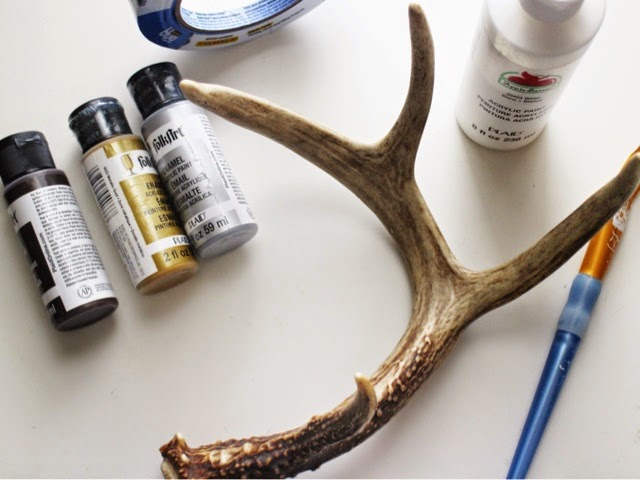
{painted antlers}

+supplies+


antlers. mine are naturally shed of course- only $10 at my local flea market!
acrylic paint (whichever colors are your favorite!)
paintbrush
painters tape


{how-to}

I wanted to keep mine fairly simple and let the natural beauty of the antler itself shine through. I opted for a classic gold and white acrylic paint. Start off by using your painters tape to section off your starting point. On mine I started all of the white paint at the same place on each section. Paint two coats of white and let completely dry. Next, tape off your next section (overlapping white paint) and paint two coats of the gold acrylic paint. Voila- I told you it was easy peasy!


Next time I go to my flea market I am seriously going to stock up on these like crazy. The naturally shed antlers are a little trickier to find, but well worth the hunt in my opinion! I originally got the inspiration to spruce up my antler from this:


A listing on etsy that was selling for $93...?!?! Personally, I think that's a bit much but it is absolutely beautiful!

Have fun with this little DIY! There is seriously so much inspiration on Pinterest or Etsy- you could do as simple or as intricate as you like. A few more inspirational patterns for your artistic self! :


Happy DIYing! 

Monday, October 6, 2014

{DIY} Makeover Monday

Happy Monday everyone!! Can you believe it is the 6th of October already? I could not be more thrilled to share with you my guestroom makeover today. I have been diligently working on it for a month now, going back and forth with ideas and I could not be happier with how it turned out. Take a look at this "one eyed one horn flying purple people eater bedroom" (sorry if you are the one who sold us this house and picked this paint color). It was claustrophobic and tiny and I felt really sad for it.

My in-laws who fly in from Europe called this room home for a month back in January and again in July. The first time they saw it they did not say much. Second time my mother in law said it was growing on her and I could leave it. My father in law who doesn't complain said "No Heidi you can get rid of it". So I did. I intended on taking the paint brush to it the week we moved in but that did not happen. It was meant to wait I guess.

{CHAIR}
So here is where it all started. This chair I found on craigslist for $40 dollars which I negotiated for $30. I brought it home one day and my husband looked at it and said "seriously?" I knew in my heart it was the perfect inspiration for the guestroom. It is so comfy and in fantastic condition from the 60s. After I found this chair I knew I wanted to go mid century with the room. I love color and wanted there to be some pops throughout. Check out the DIY Gold Geo Mobile here.

{BED}
I already had a queen size mattress and a frame but no headboard. Back to craigslist I went and scored the headboard for $20. I then reupholstered the box spring in an ivory and black polk-a-dot which I posted a couple of weeks ago.


The Kilim rug that I couldn't live without. Ebay find from Turkey.

Retro Diamond Focal Wall from Mandi at Vintage Revivals

Industrial fan came from a pawn shop for $35 and weighs more then my kid. Artwork by yours truly from my college photography class.

{DRESSER}
I was on a search for a credenza/sideboard/mcm dresser for a good 3 weeks. I searched every thrift store, restore, craigslist ad from Madison to Milwaukee. My husband then had a gig out in Peoria, IL and I tagged along searching the craigslist of every city we drove through. It was a boring cornfield nothing interesting kind of lovely drive. I found nothing. Until we drove around Peoria and I spotted a Habitat for Humanity in the distance.We stopped and OMG PEOPLE I found the motherload. I was in love head over heels with this credenza. No price was on and I just about had a heart attack thinking someone purchased it already. So, I brought the guy over and asked "how much do you want for it". He said $60!!! In my head I thought holy crap that's cheap but then I offered $40 and he took it. He took $40! Can you believe it? Me neither. I took a little teak oil to it and my goodness it is a beauty.
{PAINT}
I went from who knows what color purple/blue to these two airy whites. I first painted two coats of the Multi-Purpose Primer from Sherwin Williams. The top color is SW White Duck and the bottom is SW Pure White. Both needed 2 coats. I was floored to see how large the room became. I love dark colors but please people in spurts.


What do you think? Pretty cute right? I love big changes. What should I start next????